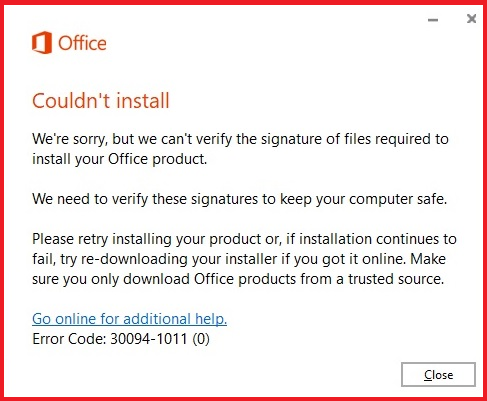
The error message “Can’t verify the signature” typically means that the digital signature attached to a file or message cannot be authenticated. This can happen for several reasons, such as:
The signature was not created using a valid digital certificate.
The digital certificate used to create the signature has expired or been revoked.
The signature has been tampered with or altered in some way since it was created.
The software used to verify the signature is not able to recognize the digital certificate used to create it. To troubleshoot this Can’t Verify the Signature error, you may want to try the following steps:
Check that the digital certificate used to create the signature is still valid and has not expired or been revoked.
Make sure that the software used to verify the signature is up-to-date and is able to recognize the digital certificate used to create it.
Check that the file or message containing the signature has not been altered in any way since the signature was created.
Check the internet connection:
Ensure that your internet connection is stable and working correctly. The error Can’t Verify the Signature in office 365/2019/2021 installation may occur if there is a poor or interrupted connection.
Check the system clock:
Ensure that the system clock is set to the correct time and date. An incorrect system clock can cause the signature verification to fail.
Update the certificate authority:
Make sure that the certificate authority is up to date. Certificate authorities issue digital certificates that are used to verify the authenticity of the software or file. Updating the certificate authority can help to resolve the issue Can’t Verify the Signature in microsoft 365 installation.
Disable antivirus or firewall:
Sometimes, antivirus or firewall software can interfere with the verification process. Try disabling the antivirus or firewall temporarily to see if it resolves the issue.
Try using a different browser:
If you are trying to download a file or software from a website, try using a different browser. The issue office 365/2019/2021 Can’t Verify the Signature may be with the browser you are using.
Contact the software provider:
If you are still unable to verify the signature, contact the software provider or the website from which you are trying to download the file. They may be able to provide additional guidance or assistance.
Quick Steps to fix Microsoft 365 or Office 2021/2019 Install Can’t Verify the Signature:
Step 1: Use a wired connection instead of Wi-Fi to speed up the download and installation process.
Step 2: Clear your browser’s temporary internet files to fix any issues. For Internet Explorer, you can do this automatically by running the program and selecting the option to clear temporary internet files.
Step 3: Can’t verify the signature in Microsoft Office 365 – To repair Microsoft Office 365/2021/2019 using the Quick Repair tool, follow these steps:
- Press the Windows key + X to open a list of commands and options.
- Select “Programs and Features” from the Control Panel.
- Choose the Office software you want to repair and select the “Change” option.
- Select either the Quick Repair or Online Repair option to complete the repair process.
- Restart your device after the repair is complete.
Step 4:
To remove Office files using the Microsoft Removal Tool, follow these steps:
- Firstly, Download the Microsoft Office 365 Support and Recovery Assistant application.
- Run the downloaded file (SetupProd_OffScrub.exe).
- Install the Microsoft Recovery Tool.
- Accept the terms and conditions by clicking “Yes”.
- Wait for the “Microsoft Support and Recovery Assistant” to troubleshoot any issues.
- Select the checkbox next to the Office product you want to remove and click “Next”.
Step 5: If you encounter the “Can’t Verify the Signature” error message in Windows 10/11, try updating your software, checking your internet connectivity, and ensuring that your device’s date and time are correct.
If the problem persists, you may need to obtain a new digital certificate or contact the sender for further assistance.
Use the Microsoft removal tool SARA:
- Firstly, Go to the Microsoft website and download the Support and Recovery Assistant (SARA) utility.
- Locate the downloaded file, which is named SetupProd_OffScrub.exe, and run it.
- Follow the prompts to install the SARA tool on your computer.
- After the installation is complete, open the SARA tool and agree to the terms and conditions by clicking “Yes.”
- Wait for SARA to finish diagnosing any issues on your computer.
- On the next screen, select the Office 365 product that you want to remove by checking the box next to its name. If you want to remove all
- Office 365/2019/2021 products, check the box next to “Select All” instead. Then click “Next” to continue.
For any additional technical support, please initiate a chat with our Microsoft Support Professionals, We are experts in resolving Microsoft Office or Windows-related issues.